Author

danielius

October 4, 2018

Old School RuneScape Melee Leveling Guide Part 3

In the third part of the OSRS melee leveling guide we are taking a look at a couple spots where XP yield and risk ratio is one of the best in the game. Make sure to check these out and get from level 60 to level 75 with ease!

In the third part of the OSRS melee leveling guide we are taking a look at a couple spots where XP yield and risk ratio is one of the best in the game. Make sure to check these out and get from level 60 to level 75 with ease!

Old School RuneScape Melee Leveling Guide Part 3

Hail, adventurer! We hope that you have been faring well and have slain dozens of monsters threatening Gielinor and her people! The path that you set upon is a perilous one but we hope that our guidelines on mindless killing and achieving
great feats have helped you on your way to the top. We figured you have already slain enough Rellekka rock crabs and the experience you have gained allows you to set forth onto new frontiers! Just be careful, I remember an old sage once told me: “Boy, you may be the best warrior there is, but taking on a dragon without a good sword and armor is as good as telling your mom you didn’t do your chores. Certain death”. Following his advice I purchased some RuneScape gold and got myself equipment worthy of the Gods! But let’s get to business: here we are with a follow-up to the second part of melee leveling guide.
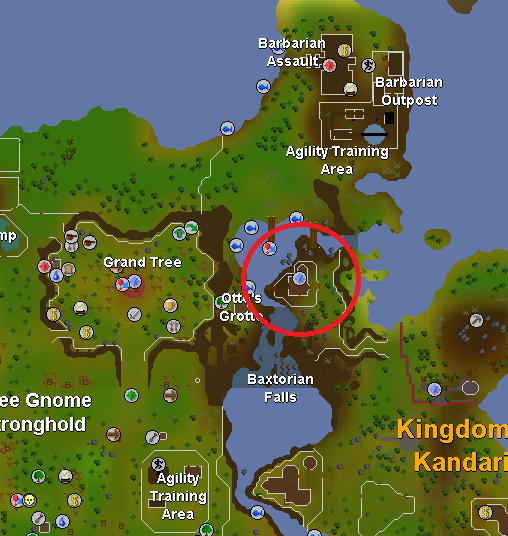
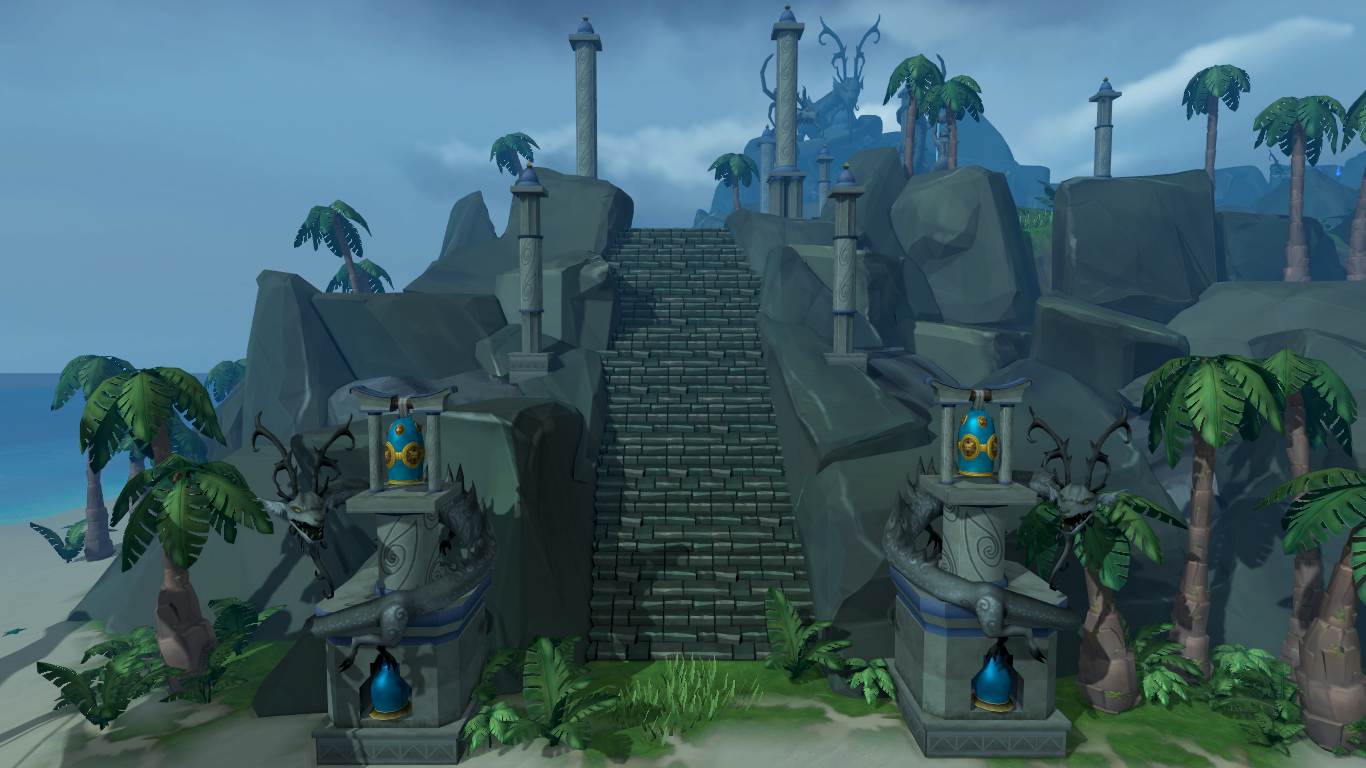
Zeah Sand Crabs

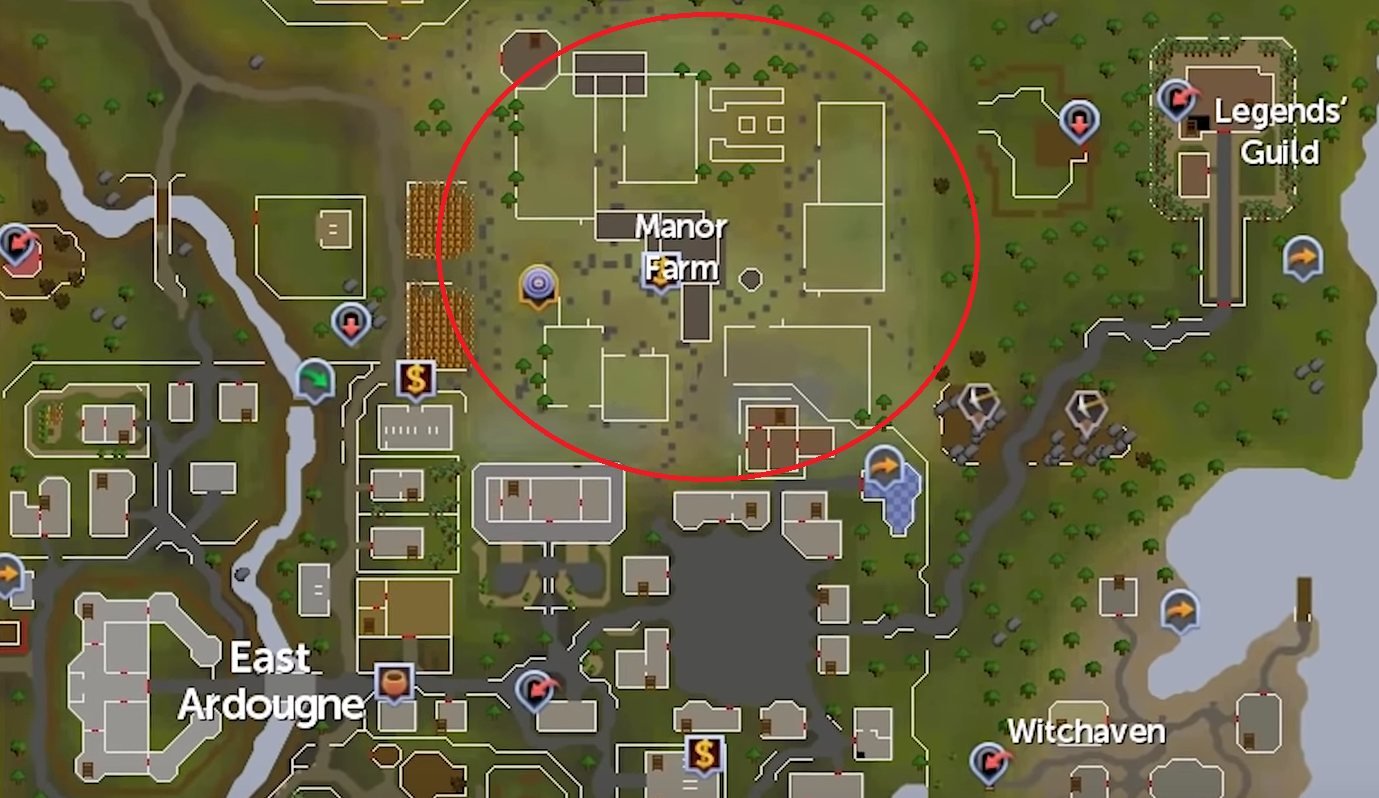
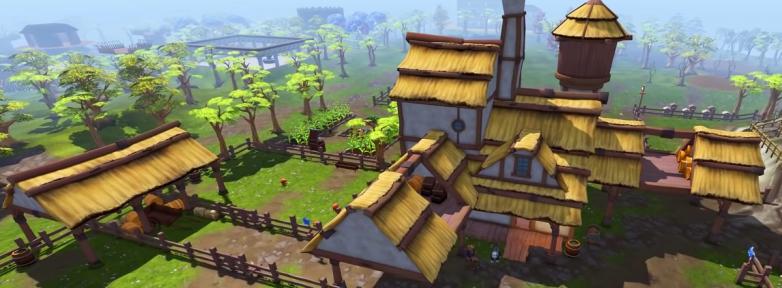
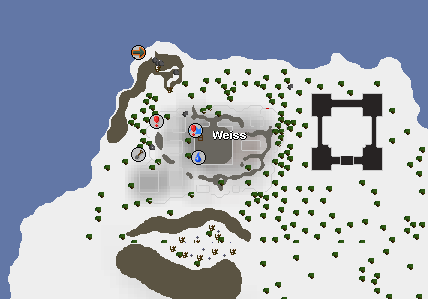
Zeah sand crabs are same as Relleka’s rock crabs in regards to everything but color and endurance. These appear to have adapted to their environment and are of yellow color, just as the sands of their habitat. It also appears that the weaker ones were culled by the scorching heat of the beach’s Sun, so the ones who survived are more enduring, having 10 HP more than their cousins back at Rellekka. Except for these two differences, Zeah sand crabs act same as Rellekka rock crabs: they camouflage themselves and only reveal themselves when they want to i.e. when a brave adventurer such as you approaches them and they attack you thinking you will be an easy prey. Wrong. Very wrong. They can be easily dispatched off and provide a decent amount of experience. What’s even better is that they can be killed with you paying little attention (just turn automatic retaliation ON) which means they’re pretty much AFK farmable. This guide is for warriors who prefer doing their fighting close and personal, but if some ranger has stumbled upon this post, we have good news for them too: you can use dwarf multicannon in this spot. Just place it near a cluster of sand crabs and watch nature’s futile attempts to battle dwarven technology. Zeah sand crabs can be found in the southernmost part of the island, south of Hosidius House. You do not need to have any favor with Hosidius House to enter this area, feel free to join the fun, get some experience and maybe get tan too! In case you do not know how to get to the spot you can watch this short guide. It will lead you all the way from Port Sarim to Great Kourend and the spot itself.

Sand crabs ambush tourists at this otherwise nice resort... Good thing you're one of those tourists who travel with sword and shield in hand!

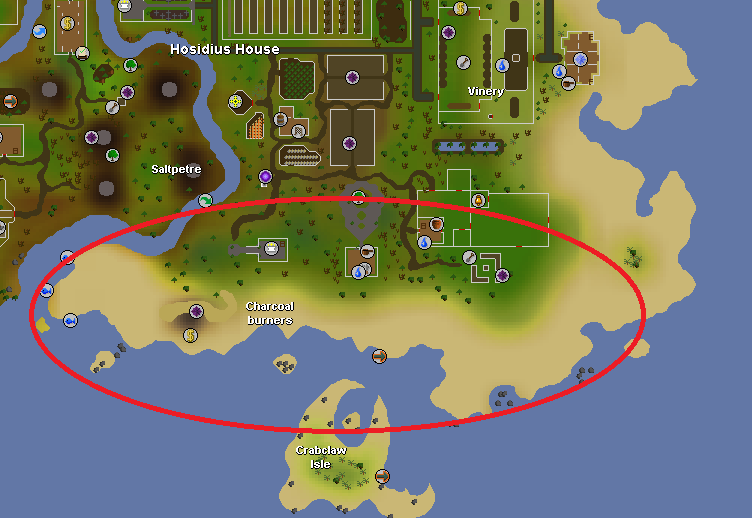
Sand crabs ambush tourists at this otherwise nice resort… Good thing you’re one of those tourists who travel with sword and shield in hand!
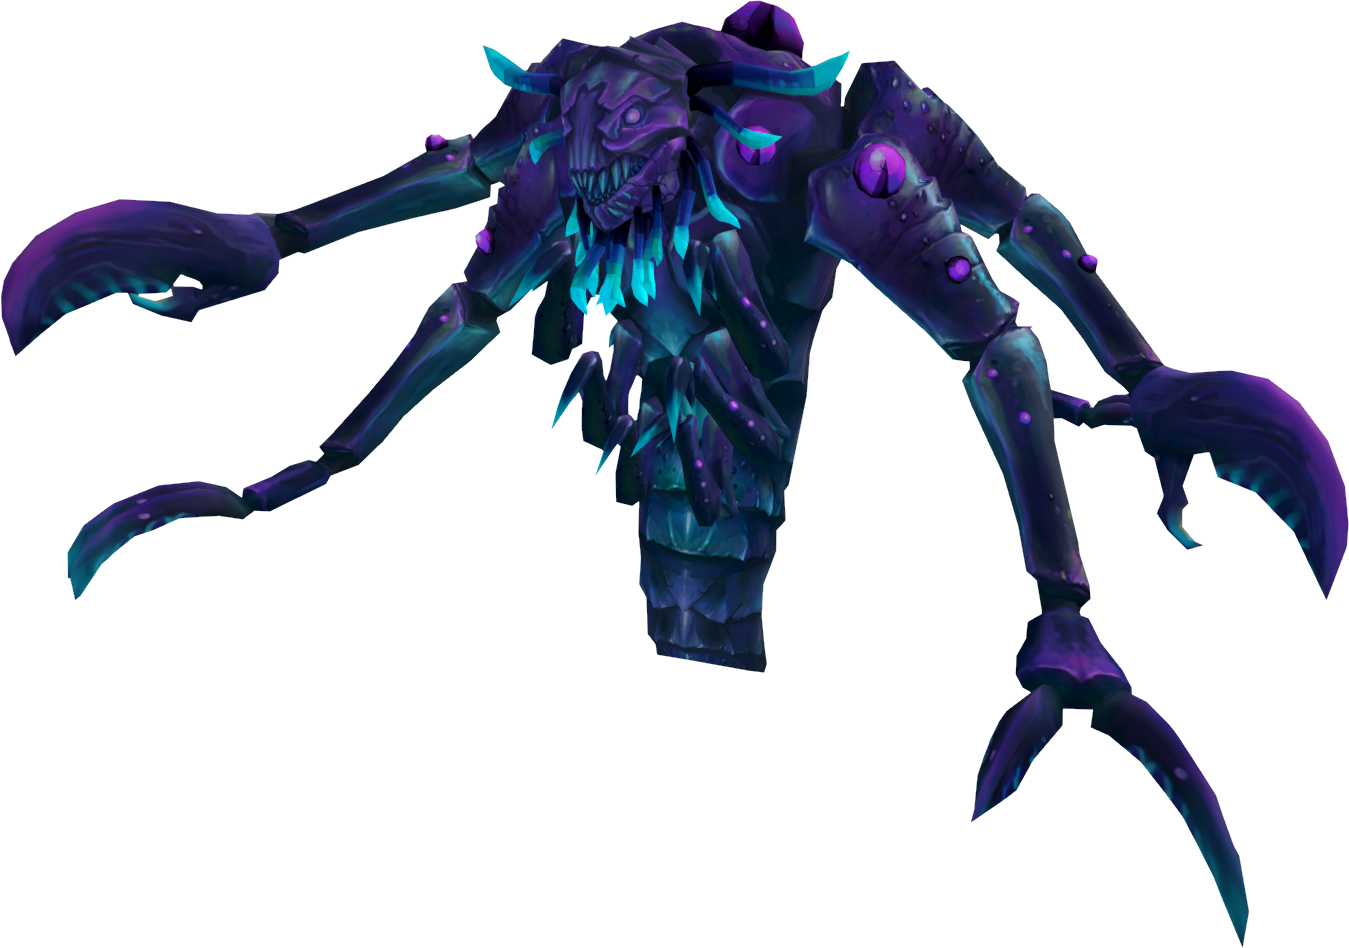
Experiments

No, we will not tell you to mix blue potion with yellow potion and get green potion. No, nothing’s going to explode. Yet something will have to be put down. These are the experiments of Dr. Fenkenstrain. This crazy fellow from Morytania in a way is probably worse than Verzik Vitur from the Theatre of Blood herself… In order to enter the caves where these abominations are held you will need to start the Creature of Fenkenstrain quest and place the star amulet on the easternmost memorial. Then you will be able to enter the dank and dark caves where these creepy and terrifying experiments are kept (good way to celebrate Spooktober). They are an easy target, since their creator wasn’t competent enough to make them equally powerful as they are creepy and they often hit zero’s, so don’t worry too much about taking tons of sharks with you. Despite being terrible at dishing out damage, they are quite tenacious thus they can take many hits. More hits = more experience. Due to these reasons experiments are easy to slay and pretty much AFK’able, so feel free to grind some AFK money making method on your other account.

The place and the quest are sends shivers down many a fighter spine. However, rewards are worth it.

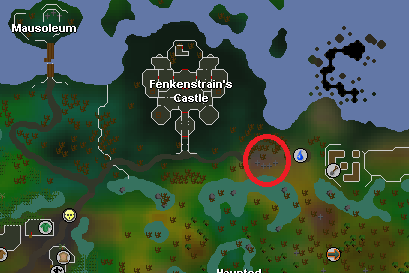
The place and the quest sends shivers down many a fighter spine. However, the gainz are worth it.

We hope you will find these guidelines useful and beat the XP gained per hour record! If not, at least you will still level up pretty fast compared to those who have no such knowledge. You can also engage in slayer tasks as an alternative, but slayer leveling is a topic of its own, so we decided it’s best not to lose focus. Have a good XP farming time!

October 1, 2018

How to get RuneScape Master Farmer Outfit

All of you farmers out there raising dragons know that pet dragons are not the only cool thing about player-owned farms! Behold, the master farmer outfit, which does not only look stunning, but also provides great bonuses, bonuses which will allow you to raise even more dragons!

All of you farmers out there raising dragons know that pet dragons are not the only cool thing about player-owned farms! Behold, the master farmer outfit, which does not only look stunning, but also provides great bonuses, bonuses which will allow you to raise even more dragons!

How to get RuneScape Master Farmer Outfit

RuneScape player owned farms is a big new feature with a lot of different new stuff and things to do brought into the game. In addition to being a good money making method, player owned farm allows you to become a farmer without having to leave the comfort of your room and exposing yourself to the wondrous array of smells that usually hang in the air of a farm. Those of you who are greenthumbs will want to show that you’re more skilled than a common peasant at taking care of your animals and that the farm you run is the best there is. And there’s no better way to do so than with a master farmer outfit! And if you’re wondering how to acquire one, this blog post is just for you.

Requirements for master farmer outfit

First things first and that means that you have to meet certain criteria to be able to get master farmer outfit. Like with any badge of honor or in this case hard labor it cannot be given to just anyone. This would diminish the value of it, wouldn’t it? We already assume that you know the basics of player owned farms, having said that, in order to be eligible to claim this outfit you must have level 80 farming and level 20 invention. Now, to collect fragments which are needed to make this outfit you need to have level 70 farming. The higher your farming level is, the less time it will take to get all 54k master farmer fragments. In case you are a few levels below the requirement or just wish to become a farming powerhouse with level 99+ farming and get the master farmer outfit by putting in just a few hours of your time, you can always purchase some RuneScape gold and get all the tools and materials you need to achieve your goal.

Best Ways to Get Master Farmer Outfit

While “best” in some cases might be subjective and you may have your own method of reaching your goals, we’ll take a look into some of the most efficient ways to farm master farmer fragments (pun intended). The first one might appear to be very unattractive at first glance, but is very good for people who may be doing something else on their other account or busy with some other stuff. That method is turning manure mound. Yeah, you’ll have to deal with a lot of poo, but we think that goal justifies the means in this case and it’s also pretty much an AFK method. Downside of this method is that you will not be really getting anything else from it, except for farming experience which is of course still not too bad.

Another great way to get master farmer fragments is to get on Arc and forage mushroom clusters on uncharted islands. To use this method you must have a level 94 farming, thus those players with lower levels will have to work their way up. Despite having quite a higher requirement, this method is easy to do, is also pretty much AFK, provides more XP points than the other methods and you will also have a chance to get a zygomite which means you can get two birds with one stone: the master farmer outfit and a cute animal to keep in your farm or make some gold by selling it.

Last, but not least, you can forage mushroom clusters on unnamed isles as well. This way works same as the one mentioned above, except that it’s available for players with level 90 farming. It provides a bit less experience and you also have a chance of getting a zygomite drop, though at a lower rate.

Not only daredevil adventurers, but dedicated farmers as well take a voyage to the Arc.

Not only daredevil adventurers, but dedicated farmers as well take a voyage to the Arc.

Bonuses Provided by Master Farmer Outfit

Once you have all the master farmer fragments, you can purchase blueprints for master farmer outfit from Granny Potterington and then create the outfit at an invention workbench at level 80 farming and level 20 invention. After you craft and equip master farmer outfit you will not only look like a highly revered master farmer who is the pillar of the community, but you will also notice something else. Master farmer outfit is not there only for cosmetics and you having bragging rights. That something else is significant bonuses you get when having the outfit. Yes, having not wearing – you only need it to equip once to enjoy the benefits, meaning that once you get tired of this outfit or see that your runescape girlfriend is already bored of it, you can simply put it back in your wardrobe and continue on raising those dragons. Here are the bonuses you get from master farmer outfit:

6% farming XP

Animals age 7% faster when you’re at the farm

Higher chance of your animals getting positive traits from breeding and checking

10% more beans when selling your production

10% chance of positive traits

10% chance of harvesting more hops, herbs and allotment crops

Hop, herb, flower and allotment seeds are autowatered

Protection payment discount by -2 up to minimum of 1

Cast Rapid Growth grow twice per patch each day

10% chance to gain bonus yield when harvesting fruit trees and bushes

Teleports to Manor Farm, Helblore Habitat and seed pod teleports

Lay your eyes upon this glorious master farmer outfit and know that great outfits come with great effort!

Lay your eyes upon this glorious master farmer outfit and know that great outfits come with great effort!

As you can see, master farmer outfit is really worth the effort and even if it takes longer to acquire it when having a lower farming level, the effort really pays off in the long run. While in real life animals aging faster may not be necessarily a good thing, the bonus of master farmer outfit in RuneScape is perfect. You will earn more gold by selling your animals and later you can sell that RuneScape gold to make some real money!

September 24, 2018

Old School RuneScape Melee Leveling Guide Part 2

Next step on our leveling guide for those who have gained some experience already. The way to the top is long and arduous journey and this is only one of the stages of this journey, but without taking it there will be no progress!

Next step on our leveling guide for those who have gained some experience already. The way to the top is long and arduous journey and this is only one of the stages of this journey, but without taking it there will be no progress!

Old School RuneScape Melee Leveling Guide Part 2

So, an upstart adventurer is becoming more and more proficient at ridding Gielinor of various kinds of pests and monsters. Sometimes livestock, but mostly monsters and pests. And now you may be wandering where to go and what to do? Maybe head to Wilderness and show off your newly gained prowess by slaying other adventurers that are not as skilled at the art of war as you (of course, they’ll most certainly blame RNG or lag after a bitter defeat. Take that as a compliment) or build up your OSRS gold supply? Or maybe delve into the lore of RuneScape by accepting quests from various inhabitants? Now, whatever you choose, know that a game has to bring you joy. And for those who have dealt with previous challenges and wish to proceed on their path to the top, we have a suggestion where to go next.

Rellekka Rock Crabs

Once you’ve done slaying chickens, goblins, cows, Al Kharid Palace guards and/or done all the quests, you need a new place to level up. And at levels 45 through 60 there is one good place to do so.

Rellekka rock crab habitat is often a go-to place for many adventurers so you might need to hop worlds sometimes. Despite how popular this pastime is, Rellekka rock crabs do not seem to be anywhere near to becoming an endagered species.

Rellekka rock crab habitat is often a go-to place for many adventurers so you might need to hop worlds sometimes. Despite how popular this pastime is, Rellekka rock crabs do not seem to be anywhere near to becoming an endagered species.

This spot is also a multicombat area, meaning that you can aggro more than a single monster. Do not worry, rock crabs do not hit much and you can safely take on more than one of them at a time. Also, for those who wish to level up their range, they can use Dwarf multicannon here – this spot is probably one of the best to unleash your secret weapon. If this map does not seem to be informative enough, you can check how to get to Rellekka rock crabs all the way from Draynor village.

In case you wish to take a break from wiping all life from the face of Gielinor and instead wish to become a wealthy member of Old Schoold RuneScape’s society, we have some suggestions how to do that as well without putting too much effort. However, for all of you “I want it all and I want it now” kind of people, we always have some cheap RuneScape gold in our stock.

September 20, 2018

RuneScape Player-Owned Farms Guide

Player-owned farm is an exciting new feature which looks interesting as much as it may be confusing. To help you with that we have compiled this simple guide which will help you in making your first steps!

Player-owned farm is an exciting new feature which looks interesting as much as it may be confusing. To help you with that we have compiled this simple guide which will help you in making your first steps!

RuneScape Player-Owned Farms Guide

RuneScape player-owned farms have been out for some time now and if you’re new to the topic you can check out our introductory post and familiarize yourself with the main concepts of this new feature. For those who have already completed the tutorial (which is a must) and don’t really know what to do next we have made this little guide to help you through your agricultural struggle.

How to start farming in player-owned farm?

Breeding animals is of course the integral part of owning a farm (we’ve already got a spot for growing plants). But how do you go about it, where to start? First things first, and this means you have to complete the tutorial. You must have level 17 Farming and level 20 Construction to do so. The tutorial will allow you to get familiar with how the farm works and will also reward you with some beans which is a new currency and is used for purchasing items from the farm shop. Beans can also be earned by selling your livestock. Alternatively, you can sell your animals in the Grand Exchange. During the tutorial you will have to build a pen and there you will keep your animals. Breeding pens in player-owned farms vary in size. Simple breeding pens store four animals, small pens store six, medium pens can hold four and in large pens you will be able to keep three animals (basically two adolescent animals and their baby). This might seem a bit counter-intuitive – larger pens hold less animals, but that’s because you keep way bigger animals in larger pens when compared to smaller ones.

Ardougne has changed since the introduction of player-owned farms into RuneScape. All for the better I daresay.

Ardougne has changed since the introduction of player-owned farms into RuneScape. All for the better I daresay.

How to breed animals in player-owned farm?

Once you have a pen you can then drop some animals in it. You have already seen how it works during the tutorial: you have two adolescent animals of same species but different genders, check them, put them into the pen and then feed them. Remember, that checking your animals is important, but feeding them proper food also is, so make sure to log in regularly and give them some food. This will not only increase their breeding rate, but will also keep them healthy and happy. And happy livestock means a happy farmer. But faster breeding doesn’t mean you won’t have to wait at all. First an animal has to reach adolescent stage. Only adolescent animals can breed, eggs and babies cannot (duh). We’ve already mentioned that keeping your animals healthy and happy is important and this can be achieved not only by feeding them regularly, but also by giving them some sweet stuff i.e. honey. You can keep bees in beehives and they will produce honey. There are different kinds of honey each with their own beneficial effects and these different kinds of honey are produced from different kinds of plants. Therefore, you must be mindful of what buffs you wish your animals to get and bring specific flowers into beehives to then get the type of honeycomb you need. You can also feed your animals strawberry or vanilla milk for similar effects.

One of many mutations of livestock bred in player-owned farms. In this case, it's sacred yak.

One of many mutations of livestock bred in player-owned farms. In this case, it’s sacred yak.

Animal traits

Your livestock will also have lots of different traits: some beneficial and some not so much. These traits are both hereditary and random, so you can never be 100% sure what traits your baby dragon will have once it hatches. These traits range from animal’s tendency to breed at a increased rate or put on weight easier to being worth less beans or producing less harvestable materials. There is a detailed article with specific information on RuneScape reddit you should definitely check out. In addition to random traits, your animals can also have random mutations. This means that there’s always a chance of you getting that extra-cool looking dragon or super cute Zygomite.

If you’re interested in making some RuneScape gold you may have been wondering which kind of animal yields most profit? Well, dragons, of course. What did you think it would be? However, dragons take the longest to grow and obtaining and breeding them is also harder and requires you to have a lot of experience already. Which means that as much as you could’ve been excited about growing your own dragons (it really is cool), you’ll have to grind through those levels if you’re not a RuneScape veteran. In addition, don’t wait for your animals to read elder stage and sell them once they reach adolescence.

September 14, 2018

Old School RuneScape Melee Leveling Guide: Questing Alternative for Pay-to-Play Part 2

The second part of leveling through questing guide covers two quests that will give you tons of combat experience: Tree Gnome Village and Holy Grail. Make sure to check it out so you can get deeper into the world of Gielinor and also don't bore yourself to death grinding levels!

The second part of leveling through questing guide covers two quests that will give you tons of combat experience: Tree Gnome Village and Holy Grail. Make sure to check it out so you can get deeper into the world of Gielinor and also don't bore yourself to death grinding levels!

Old School RuneScape Melee Leveling Guide: Questing Alternative for Pay-to-Play Part 2

Hello once again! In part one of this leveling guide we have covered three quests that are relatively easy to complete and yield good rewards: Witch’s House Quest, Fight Arena Quest and Waterfall Quest. All these quests provide combat experience, to be more precise: attack, strength and hitpoint experience. Today we’re going to introduce a couple more quests that are easily done and will also help you to advance your melee combat skills, as well as prayer. Remember, that to be able to do these you must be a member, so in case you don’t have enough coins for that bond don’t be shy and get some Old School RuneScape gold now!

Tree gnome village

If you have already completed the quests we have listed in our previous post, you will recognize this place. For those who haven’t, do not worry – it’s easy to find and get to, especially if you’re using a ring of dueling to get there. Get to the center of the hedge maze and talk to King Bolren to begin the quest. Apparently, General Khazard’s forces are attacking the village and once again you will have thwart the plans of this villain. For this quest you will need:

6 logs (or an axe)

Combat equipment (should’ve guessed that)

Food

Agree to help the gnome king and you will be taken out of the maze and into the battlefield. Don’t start flailing your sword or whatever melee weapon you have just yet. War is as much fighting as it is strategy, so talk to Commander Montai (the little guy in red clothes) and give him 6 logs to fix the defences. Once that’s done you will need to find three gnome scouts who have to tell you the coordinates to fire the ballista. Two of the three trackers will give you the coordinates you need, but one will talk in riddles, which are simple to solve, just don’t space-click through the dialog and listen to what he has to say (though, most of it will be gibberish). Once you figure out the coordinates, head to the ballista and enter the coordinates. After the target is hit thanks to your sound military mind (unlike that of some gnomes), talk to the commander again. Commander Montai will instruct you to retrieve three orbs of protection. Check the guide to see how it’s exactly done. There is more than one way to deal with the challenges and you might also want to see how the last boss can be kited. Remember to talk to King Bolren after you collect the first orb of protection! If you are too hasty, you will have to engage Khazard Warlord again!

You will find no minotaur in this maze, but it does hide something – the village of the tree gnomes

You will find no minotaur in this maze, but it does hide something – the village of the tree gnomes

Holy Grail

The famous legend of King Arthur served as an inspiration for countless pieces of literature and motion pictures… And once video games appeared, the legend found its way into them as well. After saving Merlin from his arch-nemesis Morgana Le Faye you will embark on an epic adventure to find the holy grail that will change Gielinor forever. This quest is a little bit different for its rewards as well, since this is the only one yet on this guide to provide you with defence and prayer experience. For this quest you will need:

20 Attack (which by now you should have anyway)

Completed Merlin’s Crystal

Excalibur from Merlin’s Crystal

Weapons and armor

Recommended:

Means of teleportation to Camelot, Falador, Ardougne, Entrana, Draynor

Antipoinson

It is here where you will meet the legendary King Arthur and become a part of the legend yourself!

It is here where you will meet the legendary King Arthur and become a part of the legend yourself!

Speak to King Arthur and he will tell you about the holy grail. Then speak to Merlin. Ability to teleport to Entrana will prove very useful now as you will need to speak to Sir Galahad who is on the island. Alternatively, you can travel to Port Sarim and talk to the monks who will transport you to Entrana if you have no weapons or armor equipped or in your inventory (no wonder these pacifists get thrashed all the time). So don’t forget to use bank deposit box in Port Sarim if you’re going to travel aboard the ship with monks. Once in Entrana, talk to the high priest, who much to your demise, will tell you that the holy grail is no longer there. A strange old crone will appear. Listen to what she has to say. Return to Camelot and find Galahad who is in the house west of McGrubor’s Wood. Tell him that you need an item from the Fisher Realm. Now get to Draynor Manor. On the top floor in the southern room by that crazy Pofessor Oddenstein you will have to retrieve two magic whistles. These will not appear, unless you carry the item given to you by Galahad.

Get your weapons and armor and prepare for a serious scrap, as you will be fighting no simple warrior, but a Black Knight Titan. You will need to get to Brimhaven and once there head north-west of the town. Look for a guard tower and go under it and blow a magic whistle to be teleported to the Fisher King’s Realm. It is recommended to drink Antipoison at this point because there are some poisonous scorpions (venomous, actually). Here is where the big fight awaits you. You will have to cross the bridge guarded by Black Knight Titan. Bad thing is he’s kind of tough. Good thing is you can attack-run or simply use a halberd to take swings at him from safe distance. He will not leave the bridge and this can be done without taking a single hit. Take a look at this guide to see how’s it’s done and how to finish the quest. Make sure to use your newly-gained powers to protect innocents from evil, like a good knight that you are!

We will get to more difficult quests in our upcoming posts, so stay tuned! If it happens that you’re struggling with a quest, make sure to train your evil-fighting skills in one of these leveling spots. Good luck on your path, adventurers!

September 11, 2018

RuneScape Player Owned Farms

A new big and interesting feature was introduced into RuneScape – player owned farms! Check out what is this all about!

A new big and interesting feature was introduced into RuneScape – player owned farms! Check out what is this all about!

RuneScape Player Owned Farms

It would be difficult to find a MMORPG without its version of player housing nowadays and RuneScape is no exception. Player housing has been there for quite some time, both in Old School RuneScape and RuneScape 3. A player can make their homes cosy by decorating their house however they wish, but decoration is just the surface of this concept. Players can add rooms, change the layout of their house and build a wide range of useful installments, like altars, for example. Jagex team working on RuneScape decided to expand on this concept and added player owned farms. These are somewhat similar to housing in principle but come with a vast array of new features!

Animals

Players can breed many different animals in their farms: chickens, rabbits, cows, yaks and even dragons! Yes, that’s no mistake – dragons! Different animals have different traits (good and sometimes bad) and those traits can be passed on to their offspring. Don’t be scared when you log in and check your farm and find that there is some weird looking rabbit or yak hanging around! These are a sort of mutation, a “rare version” of an animal not so special otherwise. These provide you with sweet bonuses, besides making your farm look like some fairy tale experimenting grounds. But as one wise man said, sweet bonuses come with sweat breaking responsibilities.

Location of player owned farm in RuneScape

Location of player owned farm in RuneScape

Chores

Just like in real world, certain animals will only consume certain type food. For example, you can’t feed your yaks meat or your dragons hay. Once you decide to become a farmer, know that you will also have to work like a serious farmer. You will have to feed your animals, but you will also have to do other things as well. Your animals can get sick and in that case you will have to inspect the sick animal, find out what it’s suffering from and then apply necessary treatment. Aspiring farmers will also have to deal with a ton of sh*t. Literally. Cleaning after your beloved creatures is as important as feeding and keeping them healthy and happy. If you didn’t know, the whole ecosystem is a huge and intricate cycle and Jagex did not forget about that. Though, in RuneScape this cycle is somewhat simplified, you can still benefit from it. What do we mean by that? The manure you collect while cleaning after your animals can be turned into compost which then can be used in your garden to grow herbs. At last, ultracompost was introduced also into RuneScape 3 (OSRS farmers have been enjoying the benefits of ultracompost for around a year now).

Rewards

Alongside the obvious benefits that taking care of your animals get you which, by the way, is a scientifically proven fact, doing chores in your farm will provide you with tremendous amount of farming experience, ingredients for special skilling potions and the most hard working farmers will also be able to claim a new outfit, which will scream at other players “I deal with a lot more manure daily than you do!”.

In case you don’t have enough coin to start your own farm, you can always buy some RuneScape gold from our shop. We’re all about helping out small businesses and giving them a leg up!

September 8, 2018

Old School RuneScape Mobile Release, Troll Quest and More

The most recent OSRS update brings us a new challenge to overcome and some trolls to make friends with. There are also plenty of other new things you should definitely check out!

The most recent OSRS update brings us a new challenge to overcome and some trolls to make friends with. There are also plenty of other new things you should definitely check out!

Old School RuneScape Mobile Release, Troll Quest and More

While most of us were on summer vacation travelling or playing our favorite game, Jagex didn‘t rest and OSRS team kept watch over their baby. Was it solving issues promptly or delivering updates, the work went on despite temptanions to cool oneself off in a pool. In this post we will be overviewing the most recent update.

Old School RuneScape Mobile Release

Finally! After months of closed and open betas, Jagex announced the official release date for OSRS Mobile, which is October 30th. Kind of spooky, if you ask me, but welcome news nevertheless! Currently only members were allowed to enjoy playing the game on their mobile devices during traffic jams, but now free players as well will be able to ease the pain of daily commute with a fix of OSRS play time. You might be wondering how does OSRS Mobile work and if you are, check out our previous post on OSRS Mobile to see what‘s it all about. Some minor changes have been since then, though, but these are mostly related to user interface. Jagex kept true to their word and took not of players‘ feedback and implemented some features to make it easier for OSRS Mobile players to enjoy the game! You can pre-order the game on the App Store or pre-register on Google Play to make sure you don‘t get left behind.

Making Friends with My Arm

Another addition to Old School RuneScape is a new quest “Making Friends with My Arm”. The idea of the quest was announced a couple years back, but the poll whether this idea should be realized or not was held back in August this year. We see now that most of you wanted a sequel to troll quest and now you’ll have it! This is a master quest, meaning that you newbies out there will have to work your way up to be able to take part in this quest, but we believe that the effort will be worth it. Quest requirements are:

66 Firemaking (no boosts allowed)

72 Mining

35 Construction

68 Agility

Bucket

Rope

Saw

Hammer

Bolt of cloth

5 mahogany planks

Cadava berry

And, of course, combat equipment

On the northern edge of the world and east of Wilderness live a tribe of Weiss trolls and they will teach you a thing or two

On the northern edge of the world and east of Wilderness live a tribe of Weiss trolls and they will teach you a thing or two

There are quite a bunch of quests that have to be completed as a requirement and you can check out the full list of rewards as well as the walkthrough. Community content makers aren’t sleeping as well! This quest’s main rewards are access to the Salt Mines, ability to build fire pits that will burn permanently and a new disease-free herb patch in Weiss. Druids approve the latter, but building permanent fire pits can’t be good for the climate… You will not have to worry about getting to your new herb patch since you will be able to build a Troll Stronghold portal in your own house. Now that’s convenience!

Trolls know something we do not about farming in arctic climate...

Trolls know something we do not about farming in arctic climate…

If you’re interested in the new merchandise and more, check out news here. For those out there who are excited about the new quest but can’t really embark on the adventure due to them not meeting the requirements – do not worry and grab a some Old School RuneScape gold for a good price and so you can boost your progress and jump into the action without having to farm seemingly eternally for a few coins!

September 2, 2018

Old School RuneScape Melee Leveling Guide: Questing Alternative for Pay-to-Play

Members can use a somewhat different approach to the game and leveling is no exception. In this short post we will cover a few quests that will get you some sweet combat experience and nice rewards!

Members can use a somewhat different approach to the game and leveling is no exception. In this short post we will cover a few quests that will get you some sweet combat experience and nice rewards!

Old School RuneScape Melee Leveling Guide: Questing Alternative for Pay-to-Play

Welcome back! Last time in “Old School RuneScape Melee Leveling Guide: Where to Start?” we have covered where and how to start leveling from level 3 to level 45. As mentioned in that post, there is another way of reaching level 45+ which is arguably faster and for some players may be a more attractive choice: it is questing your way through these levels. The only catch is that you must be a member to be eligible for these quests, so if you are interested in achieving level 45 and possibly a bit higher doing them, do not sit around and buy some Old School RuneScape gold! Okay, now you’re back and hopefully with a bond in your inventory waiting to be activated. Let’s go!

For starters you want to go to the GE and buy a bond and some items:

Some food (salmon is the best choice at this point)

Cheese (more than a single piece just to be safe)

Saradomin brews and super restore potions at low levels

Leather gloves

6 of each: air runes, earth runes, water runes (might take more to be safe)

A rope

Recommended:

Stamina potions

Ring of Dueling

Games necklace

Take only the items you need for the specific quest!

Before doing quests you will need to gain some levels first (just some, refer to our previous post).

Witch’s House Quest

Witch’s house quest is the one you may want to start with as it will give you 6325 Hitpoints XP which will be needed for other quests. It’s easily doable with some levels in Range or Magic, but using a halberd you will be able to use the safe spot as well. You will need to pass through the gate north-west of Falador and talk to the boy. Read the dialog and choose the option to get the boy’s ball for him. This will begin the quest.

For this quest you will need:

Cheese

Leather gloves

Food

Full gear as you will need to fight

Stamina potion/Falador teleport tab recommended

Saradomin brews and super restore potions at low levels


Witch's House quest start

Witch’s House quest start.

After talking to the boy go to the witch’s house. You will need a key to get into the house, which you will find under the flower pot near (right-click the pot and search). This will get you into the house. Once in the house, equip leather gloves and go into the basement. Open the gate and search the cupboard. Then go back upstairs and read the diary. Read the diary and go to the small room to the south. Here is where the cheese you brought will come in handy. Use the cheese on the mouse hole on the eastern wall and then use the magnet you looted on the mouse. For what to do next watch this guide as it will be a lot easier after you actually see how it’s done.

Fight Arena

Fight arena quest presents adventurers with a really serious challenge. Thus, you need to use either your wit or your muscle. In this case we will use wit, as fighting the enemies in the arena directly would require you to be able to kill a level 137 monster. Not something a beginner could overcome, is it? Once again, your halberd will come in handy.

For this quest you will need:

Full gear

Food

5 coins

Optional:

Ring of Dueling for teleportation to Castle Wars which is in the vicinity of quest area

Fight Arena quest start.

Fight Arena quest start.

To start this quest you have to talk to Lady Servil, a lady in distress found in the northeast of the Tree Gnome Village. Once again, agree to help. Then head east until you reach the last house in the northeast. Don’t be shy and enter. Then, don’t be shy and search the chest. In that chest you will find Khazard armor, which you will need to enter Khazard’s personal playing ground disguised as one of his minions. There you will see a boy locked up in a cell. Talk to him and find out where the key is. For the rest, watch this guide. It is important that you know the exact location of the safe spot. Bring food and stay alert!

Waterfall Quest

A long and rewarding adventure involving yet another boy. Save the children, am I right? Unlike Fight Arena, this quest does not require you to fight anyone, but those levels you gained in Witch’s House and Fight Arena will help you a lot now, since at a certain point during this quest you will need to run past a bunch of very unfriendly Moss giants.

For this quest you will need:

6 of each: air rune, water rune, earth rune

A rope

Optional:

Games necklace (for teleportation to Barbarian Outpost)

Stamina potions

Waterfall Quest start.

Waterfall Quest start.

For this quest you will have to talk to the boy’s mother, Almera whom you will find northeast of the Baxtorian Falls. Teleporting there using games necklace will save you a lot of time. Talk to the mother. Now go to the river and board the Log raft. BOOM! You will crash, but that’s the way it’s supposed to be. You will need to find a safe (relatively) way of getting down the river. You have brought the rope with you, didn’t you? Follow the instructions in this guide and you will complete this quest in no time. Better to see something once than to read about it a thousand times. Also note, that there is a bank in Barbarian Assault, make good use of its services.

There are plenty of other quests which reward strength/attack/defense XP. We will cover other ways later, until then good luck and stay tuned!

August 28, 2018

Guide to Elite Dungeons 2: The Dragonkin Laboratory

Elite Dungeons 2: the Dragonkin Laboratory has been out for some time now and a lot of players have already cleared the dungeon multiple times. In case you hesitated for whatever reason, now is your chance to jump into the dungeon and save the day too: armed courage and knowledge from this guide you will overcome the challenges of the dungeon easily!

Elite Dungeons 2: the Dragonkin Laboratory has been out for some time now and a lot of players have already cleared the dungeon multiple times. In case you hesitated for whatever reason, now is your chance to jump into the dungeon and save the day too: armed courage and knowledge from this guide you will overcome the challenges of the dungeon easily!

Guide to Elite Dungeons 2: The Dragonkin Laboratory

Elite Dungeons is a welcome addition to RuneScape content as it is something similar to raids in the way it’s done, but also suitable for players with less time and wish to do solo runs. The Dragonkin Laboratory has been out for a while and a lot of adventurers have already headed into the once secret dungeon and fought the monsters within it. If you haven’t done so already, whether you didn’t have time or didn’t know if you are up to the challenge, here’s a short guide of how it’s done.

For the Dragonkin Laboratory you will need:

A weapon that’s T90 or higher

Armour that’s T80 or higher (with PVM perks and stuff from Dragon Slayer also works here)

Zerker aura or the best accuracy aura you’ve got

Amulet of souls

Ring of Death or Aylum surgeons ring

Nightmare gauntlets if you’re range, Cinderbane gloves for melee and magic

Scrimshaws: cruelty (range)/elements(magic)/vampyrism(melee)

Off-hand crossbow + chins (hexhunter if you can get your hands on one)

Melee scythe

Vuln runes

Range magic planted feet switch

A shield

Supreme overload salves, anti dragonfire potions

Lucky charms (for rare drops) 10k dg tokens

Replenishment

Weapon poison ++

4 brew flasks, 2 restore flasks, food

Optional: bladed dive switch

Dominion mines if you have some

Cleaning up the place

The action starts just after you enter the dungeon. You will see a magic barrier and to lift it up you will need to kill cave slimes. Though they look like sentient buggers, they can deal some serious damage if you’re careless. Same rules apply for every area separated by a magic barrier: kill the mobs guarding it and a barrier will be gone. There is no need to kill all the mobs to complete the dungeon, but if you only feel satisfied with achieving total victory, by all means, destroy as many monsters as you find. A piece of advice: try to lure enemies and get them as close to each other as possible so you can AoE them effectively. Those interested in the lore will also find books scattered throughout the whole dungeon and may wish to look around some.

A magic barrier in the Dragonkin Laboratory. To lift it you must defeat the monsters guarding it.

A magic barrier in the Dragonkin Laboratory. To lift it you must defeat the monsters guarding it.

Astellarn

The first boss in this dungeon is also the first celestial dragon. A result of an experiment, she is very unstable and aggressive and for this reason is being kept locked up in the laboratory. The very first encounter in the dungeon may arguably be the hardest one, so stay sharp!

Engagement:

Pot up (duh)

Deal damage to the boss until it begins its ability cycle

At first Astellarn will spawn a pulsar star somewhere in the room. You have to destroy the star because it will deal damage periodically

Later the boss will spawn a wormhole. Position yourself good and after it appears step aside for it will also do damage.

After the wormhole Astellarn will spawn a neutron star which will deal you 7k damage if it hits you. Lure it unto the wormhole and the wormhole will turn white. Once it does, stand on it. If you fail, boss can’t be damaged. You will always have to stand on the wormhole once it merges with a neutron star and turns white.

Another of boss’s attacks is that she summons raining stars on random quadrant of the room. You have to stand on the white wormhole during this phase in order to damage Astellarn and that’s why positioning the wormhole is important as because if you do this right (move it somewhere in between two quadrants) you will be able to damage the boss during that meteor shower attack. This is the last of Astellarn’s unique abilities. After that the cycle just keeps on repeating.

Always stay alert, especially when a neutron star spawns

Verak Lith

Verak Lith is a vicious three-headed dragon who looks like it came straight from a fairytale. And this time you get to be the hero in the fairytale who defeats the dragon. Luckily enough, this is a relatively easy engagement and once you get the hang of it, it can be done without using any food at all.

Engagement:

Pray protect from mage

Pot up

Verak Lith begins the fight with him slamming his tail against the ground. A spike comes up from ground (pray melee or resonate to avoid damage) and you can’t attack the boss until spike’s up, so you’ll have to destroy it. Make sure you’re not too close to the boss when spike is up so that you don’t get too much damage.

Next you will see a message saying: “Shock/ice/poison ricochet off you”. Green arrows will appear on the screen and you have to collect the highlighted item. A timer will appear above your head once you do that. If you have not collected the item or the timer runs, you will receive more than 10k damage.

One way of dealing with this is you have to pray protect from magic when timer is somewhere around half about half cast devotion then resonance.

In case your resonance is on cooldown you can collect element an element: ice, shock or poison. Look at which one shows up above your head and DON’T collect it. The trick is you have to pick any element except the one that’s above your head. Click “investigate” and the bar will be removed from your head and attack will be interrupted.

Then the boss will throw up a big ball of fire which then will shatter into several pieces. Avoid the little flame tornadoes that appear after that at all costs as they can ruin your day.

The last of Verak Lith’s attacks is calls in his buddy to get some air support. You will see a message: “A black dragon is about to swoop down”. An area on the field will be marked where the air support dragon is going to deal damage. Just stay out of it and expect him to come back some time later after he has refueled.

The second boss in the Dragonkin Laboratory, Verak Lith, sure does look better after the graphics update. Just not happier.

Black Stone Dragon

Black Stone Dragon is the worst of the experiments in the Dragonkin Laboratory and as in the case with Elite Dungeons: Temple of Aminishi, the last boss is a lot harder than the previous one’s combined. This encounter will also keep you running, dodging and yelling at your computer screen in case your sausage fingers fail you.

Engagement:

First phase

You can choose which way you want to fight. Either in close combat and praying protect from melee or you can kite the boss and pray protect from magic.

Spikes will appear from the ground that deal a lot of damage. Once they do, forget anything you were doing and just run.

Another of Black Stone Dragon’s attacks is that it shoots a cloud of black smoke at you. You can either try to soak the damage while praying protect from magic or avoid them.

Second phase

Four arms will spawn around a circle in the middle of which the boss will be chilling. Do not try attacking it as it will be futile – until all of the arms are destroyed the boss cannot be damaged.

These arms are no Thing and should not be joked around with. Stay out of the circle so you’re out of range. If you get too close, you will have to deal with more than one arm. Fighting a single arm, however, will be a piece of cake once you get some practice.

Once an arm slaps the ground it unleashed the same black smoke cloud attack the boss does.

If a cloud hits you the arms will spawn their mini-me’s similar to the ones in Temple of Aminishi, which will crawl towards you. Avoid these and you will be fine.

Third phase

Light blue flame appears and moves in a circle slowly closing in around Black Stone Dragon. During this time the boss is immobile and does not attack. You can get as close to the dragon as possible and DPS the hell out of it.

Just avoid the circle of flame and deal damage in peace.

Fourth phase

Black Stone Dragon jumps around the area for 10 times. Blue flames come towards you after each time it lands. Just dodge and you’ll be fine.

Last phase

Black Stone Dragon becomes reasonable again, lands on the ground and the fight continues. Attack cycles will repeat, so you’ll know what to expect.

Black Stone Dragon is the third and final boss in the Dragonkin Laboratory. The worst experiment you will face in the dungeon.

All this information might be a little too much to digest in one time, so make sure to also check out how this dungeon is actually done live. Remember: you can always leave the dungeon and get any supplies you might need. Your progress will be saved and you can use the chests inside the dungeon as teleport spots and turn-off autoloot during boss fights. We hope that you will find this guide useful and in case your membership has run out and you wish to slay some dragons, get some RuneScape gold. Do not let the lack of a bond stop you from enjoying the game!

August 16, 2018

Guide to RuneScape Elite Dungeons: Temple of Aminishi

The Temple of Aminishi is the first dungeon in Elite Dungeons series and is worth visiting whether you're a lore player or interested in that precious loot.

The Temple of Aminishi is the first dungeon in Elite Dungeons series and is worth visiting whether you're a lore player or interested in that precious loot.

Guide to RuneScape Elite Dungeons: Temple of Aminishi

Since raids system was such a success, Jagex looked for a way to mimic that success and also attrack more players with less time to spend playing the game and this resulted in Elite Dungeons: a miniature-sized raids, if you will, which need up to 3 people to complete, but can also be completed solo and reward system seems to encourage that. In this blog post we’re going to review Elite Dungeons: Temple of Aminishi.

Requirements for Temple of Aminishi

There’s essentially only one requirement to be able to enter Temple of Aminishi and it is the completion of the quest “Impressing the Locals”. Once you have completed the quest, you can enter the elite dungeon. Of course, you also have to be able to fight the monsters inside, you know, the usual.

Temple of Aminishi Layout

The Temple of Aminishi is divided into five sections. To unlock the next section adventurers must first kill the monsters guarding the barriers. Players progress through each level of the dungeon in linear order and can find chests in the second, fourth and the last section of the dungeon. These chests can be used in a similar way to lodestones, meaning they serve as teleport spots.

Tackling the Challenges in Temple of Aminishi

As it is common with dungeons, there are a lot of monsters. In this dungeon most of them are particularly aggressive too, meaning that if you aggro one monster of a group, others will join the fight. Thus you should be prepared to fight the whole group and tread carefully and engage only once you’re ready to. If you’re short on time, you can focus only on the monsters that are guarding the barriers. Killing them will allow you to get to the next section and also despawn most of the monsters in the current one. This may be a preferred tactic, since mini bosses take some time to kill yielding relatively low rewards and common monsters yield mostly basic loot. Those who only wish to complete this dungeon because they’re interested in the lore or want to access the recently launched Dragonkin Laboratory can also complete it in story mode – it will yield close to none rewards, but the dungeon will still count as completed.

Climb up the stairs and face the challenges that lie in Temple of Aminishi and become a hero! Or rather, loot all and become filthy rich.

Boss Fights

There are three bosses in Temple of Aminishi, each with unique mechanics: the Sanctum Guardian, Masuta the Ascended and Seiryu the Azure Serpent.

The Sanctum Guardian

The first boss of the elite dungeon, Sanctum Guardian is located in the second section of Temple of Aminishi. It uses melee and ranged attacks interchangeably and has to be engaged form the north-eastern corner of its lair. The first player to engage it will be targeted by its purple-colored ranged attacks, which can be evaded but do not deal too much damage and can also be absorbed just to finish the fight faster. After four such attacks the boss will splash dealing a lot of melee damage. Knowing that it does this only after four ranged attacks, you can easily avoid being splashed on. Just keep it in mind that splash has more range to the west of the boss. Another attack that deals a lot of damage is when Sanctum Guardian starts vomiting water all over the place. It starts from around north-eastern part and goes full 360 degrees counter-clockwise. This is the reason you should engage it from the north-eastern side and if every member of the party stands in that spot, this attack is easily avoided. Last, but not least, Sanctum Guardian can place a curse on a selected player. A bar will appear over the player’s head, which when reaches 0, places a 5×5 spot of purple death gas on the ground. This bad purple air deals increasingly more damage over time and should absolutely be avoided or else this relatively easy engagement will turn into a real nightmare.

TIP: you can run away to some more remote spot before the bar reaches 0 to release the noxious gas on some place where it will not get in the way when fighting the boss.

The Sanctum Guardian in all its beauty. Wonder if I can catch it with a lobster pot?

Masuta the Ascended

The evil version of the karate kid just with some additional magic powers, this boss uses all three types of combat: melee, ranged and magic. While Sanctum Guardian is quite easy to take on and requires minimum effort to dodge its attacks, Masuta the Ascended is the embodiment of the saying “size doesn’t matter”, because he’s a real tough guy, little when compared to the previous boss.

Masuta the Ascended has three phases. In the first one you need to dodge. A lot. He uses several types of attacks:

He can summon purple gas, which explode after some time .This mechanic is easily avoided.

He can pulverize a player. Before this Masuta the Ascended yells “I pulverize you!” and then uses AoE attack in that player’s direction. This ability is also easy to dodge, but if you pray melee you don’t even need to do that.

Probably the most dangerous of his attacks is the spinning attack. This one deals some serious melee damage which increases with each hit, so be careful. This one requires more attention to dodge, but is doable.

In the second phase you’ll have to deal with Masuta the Ascended’s minions rather than him, since he goes invincible during this phase. Instead of fighting you directly, he summons thrashing water mobs which are rather easy to kill but can do some serious damage if you become careless. The key here is to kill all those minions and be close to them before they die, so you can get a “Calm Waters” buff which will help you a lot during the third phase: it reduces the amount of damage you take from their master, each stack gives you 5% damage reduction.

In the third phase Masuta the Ascended uses ranged attacks in sequences of 3 to 5 and then he jumps and slams the ground releasing a huge wave of purple water. This attack can deal a lot of damage, but if you’ve done your homework during the second phase and now have 70% damage reduction, you don’t have anything to worry about. But if your buff is only around 35% or 40% you should watch out, since this attack can deal a lot of damage.

Masuta the Ascended is a strong foe and you would do well to keep away from him, but not too far away.

Seiryu the Azure Serpent

This one’s bad serpent doesn’t mess around and is the reason why some of the players only complete this dungeon in the story mode. Indeed, this boss deals heavy damage as is expected of the last boss and requires a lot of patience, especially if you decide to solo it.

Seiryu uses a mix of basic attacks and abilities. It has a wider array of abilities up its sleeve than other bosses and they can cause you much pain, unlike basic attacks which are, well, basic.

Purple fire stream

I know you might be sick already from all the purple in this dungeon, but this one beats all other purples hands down – Seiryu launches it quickly and the stream breaks apart on impact and splits into two smaller streams. If you’re soloing it you will probably have to avoid standing in the point of impact, but for those who have friends: be careful, this ability can damage you even if you weren’t hit initially.

Sneaky tail

During the fight Seiryu’s tail is shadow-injected into the floor. Once a shadow appears under a player, that player would do well to move from that area or they will go six feet under.

Dragon breath

The usual thing with dragons and sometimes serpents apparently, this attack will require you to use defensive measures rather than try and dodge it since it’s very wide and relatively quick.

Shadow arms

This is a bit weirder one. This attack begins with your screen turning blue (probably Jagex thought it was funny to exploit peoples’ fear of blue screens). An arrow appears both on minimap and screen itself for all players, indicating a tile. Once this black energy reaches the tile, shadowy arms will reach out for players and damage them. Standing on the tile will prevent these arms from spawning for that player.

Bored

After a certain amount of damage is dealt to Seiryu, he will pass out, giving you the opportunity to jump on his back and damage crystals. During this time, several black blobs will spawn, which heal Seiryu once they reach the serpent. What you want to do is jump back on the floor and kill them. To make it faster you can wait for six of black blobs to spawn and kill them all at once. After some time you will be forced back on the floor again and will have to repeat everything over. Your goal is to break all the crystals thus freeing Seiryu and completing the dungeon.

Seiryu, the Azure Headache of many adventurers requires patience and some serious dodge tactics.

TIP: if you wish to only farm XP and tokens and have no need for loot, you can farm the first two bosses. You need only to kill the Sanctum Guardian, Masuta the Ascended and the restart the dungeon and repeat the whole process over again. This well get you around 150 to 200k tokens and anywhere from 1m to 2m XP, depending on how skilled you are.

We hope you will find this post useful and this will help you farm all the valuables inside way faster and in a more efficient way. In case you it happens that you don’t know what to do with all that gold you can turn it into real money by selling your runescape gold to us. Unlike the alchemists of middle ages, we deliver!